reaConverter's latest edition includes a series of features that help you keep files, folders and subfolders in good order during conversion, thus helping you avoid doing a series of repetitive and dull arranging operations manually.
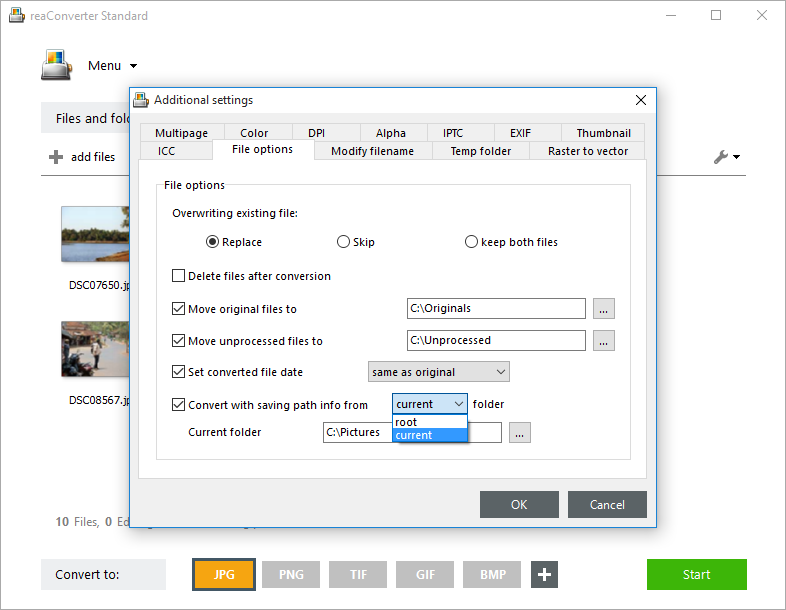
One of the very useful features of this type is the one that helps you preserve the file path and folder structure info from a folder of your choice while converting your images. Available options include the source folder, root folder and current folder.
Open Images
Load one or more images you intend to convert. Use the handy drag-and-drop tool or add files manually, either individually or by selecting entire image folders.

Keep Path Info and Folders Structure
Go to the Menu button and then select Saving settings → Additional saving settings

Here find the File options tab and tick the box that says Convert with saving path info from, and then pick your choice from the dropdown menu (root folder, current folder or source folder). Your desired folder and subfolder structure will define the new location of the output files in detail and help you save time and effort with organizing converted files.

Save the Result
Go to the Saving options section for additional possibilities regarding the location of the converted files. Last but not least, pick the format of the output images from the buttons placed in the lower part of the screen. JPG, PNG and TIF are among the most popular choices, but reaConverter also supports a variety of others (click the Plus button and more will show up), including rare and archaic.

Finally, click the Start button and your images will soon be converted using your desired path and folder structure.
Video tutorial
Share
Command-line interface
Advanced users can do the same using command-line interface in manual or automated mode. You are welcome to contact our technical support when you have any questions about reaConverter.
Download reaConverter Pro with CLI