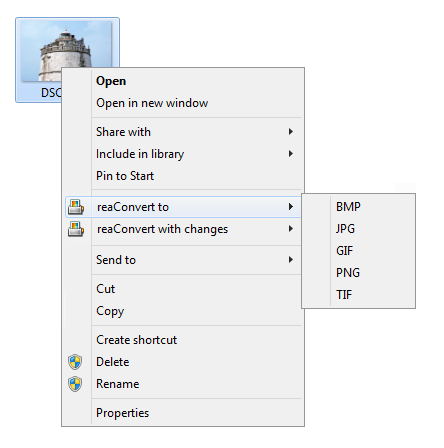
Managing basic image conversion processes with reaConverter's latest edition takes less time and effort than ever! And now it doesn't even have to include opening the actual program — you can manage everything from Windows Explorer. Simply browse and select the images you intend to convert, right click and opt for a regular conversion, or for a conversion with changes.

Activate Integration
Open reaConverter, go to the Menu button and click Context menu integration. Then make sure the ON button is ticked.

Use Windows Context Menu
Open Windows Explorer and go directly to the folder that contains images you intend to convert. Select one or more image files, then right-click and pick one of the converting operations connected with reaConverter.

Default options include converting to 5 of the most popular image extensions (BMP, GIF, TIF, JPG, PNG) and adding some of the most used image editing features to the conversion process (resize, blur, rotate, sharpen).
Customize Right-Click Menu
You can customize at any time these context menu items by going back to reaConverter's Context menu integration settings, where you can add or delete particular types of operations related to conversion, by linking reaConverter configuration (.cfg) and action (.act) files.

To add a new option, click the + sign and specify all the necessary settings in the window that appears: give your new option a name and browse for the prepared configuration and action files.

Create Config .cfg File
Configuration .cfg file transmits information on the output format and its settings, destination folder, additional settings, file options, file name modifications and conversion options (transparency color, loading settings, etc.). Tune all reaConverter settings using main interface and save settings into .cfg file.

Create Action .act File
Action files take care of the image editing actions you need to apply. Add image editing and save it into .act file.

Video tutorial
Share
Command-line interface
Advanced users can do the same using command-line interface in manual or automated mode. You are welcome to contact our technical support when you have any questions about reaConverter.
Download reaConverter Pro with CLI